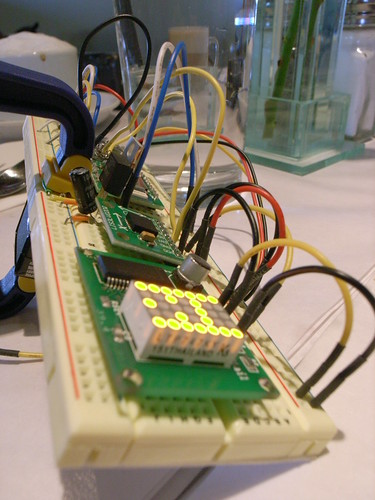
An on-going project that requires the display of alphabetic and numeric characters using a 5×7 LED matrix turned me towards a chip by Maxim IC — the MAX6953. The chip, while expensive (~$8), has lots of built-in features that mitigate the damage to my purse, trading such in kind for time-saved. It will directly drive up to 4 5×7 LED matrices with direct control from a microcontroller over a two-wire interface (TWI/I2C), can manage varying intensities (16 or 32 degree scales), has a built-in Arial-like font set with a reasonably full-range of characters, diacritics and symbols, and allows me to create 24 characters of my own design.
Here’s my Eagle PCB library of the MAX6951 and MAX6953; feel free to use it.
My first attempt at mucking with the chip used the DIP version, which is ginormous and requires such patience and diligence with wiring the thing up — all those lines going to the pins of the LED matrix — that I pretty much gave up after it didn’t work the first time. I decided that I’d just go ahead and design a PCB for the thing and continue to hone my skills with Eagle, while also learning how to work with the MAX6953.
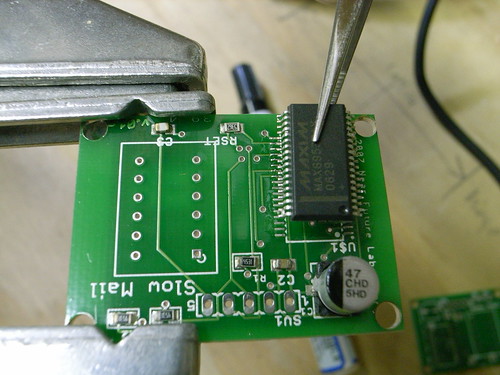
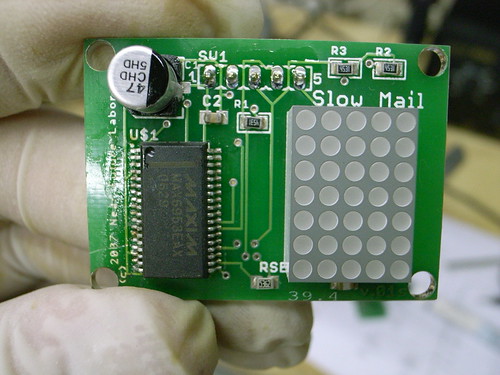
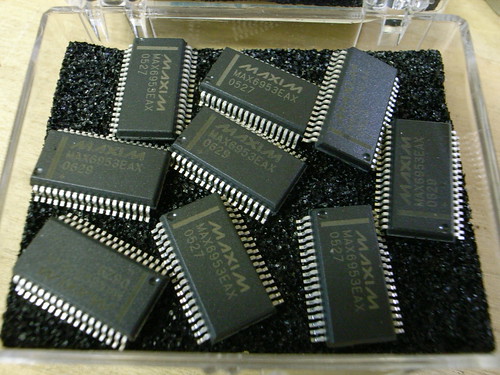
I sent a design off, it came back, I stared at it for a few minutes, looked for the MAX6953’s in my bin of samples and realized I didn’t have any. I managed to coax a bunch from Maxim’s sample guy, which is great. (Thanks whoever you are, wherever you are.) A couple of weeks later, when my plate was relatively clear, I assembled one of the boards, using a yellowish/orange 5×7 matrix LED I purchased from Digikey and manufactured by LiteOn. I wanted small, but the closest I got to small was 0.7″, which still seems big to me. (The story of it’s assembly and problems therein is instructive if you’re curious about surface-mount PCB work..and the problems therein.)
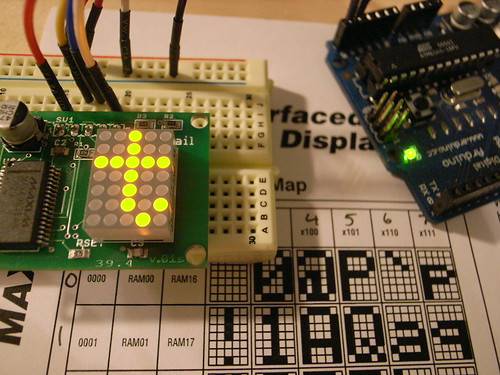
I powered the thing up and, naturally enough, it didn’t illuminate at all. I poked through the spec sheet and figured out that there’s a whole start-up ritual you’ll want to go through, such as the test mode and negating the shutdown bit, which defaults to “shutdown enabled.” After an hour or so of puzzling, I managed to get it displaying characters while hooked up to my usual Arduino test harness thing.
While I was assembling the board, I realized I wasn’t sure what the proper orientation of the LED device should be. I looked for markings to indicate pin 1 and found nothing definitive. I looked at the product data sheet and they had an arrow pointing at pin 1 but nothing that clearly told me how to determine which of the pins was the first. Now, the holes I put in for the LED device in Eagle were a bit snug — too snug, really. It required a bit of jiggering to get the LED device to fit. (I went back and made the holes slightly bigger in the design.) But, I realized this could be an advantage given my current pin alignment peril — the snugness would allow the LED device’s pins to make contact with the through-holes’ platings! In other words, I could fit the device one way and not solder the pins to see if I had the thing right-way-around.
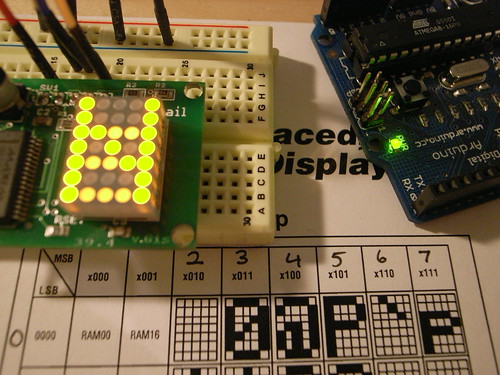
Well, that worked. A consequence of it working was that some of the columns and rows didn’t illuminate quite consistently — they’d flicker and such — and a mysterious character appeared — an evil rabbit was the first thing I saw.
I ran through a few code gyrations and got characters to show, right-way-around, so I went ahead and soldered the LED device permanently to the board, easy-peasy.
Thinking of a few possible ways to make this learning project fun to share for the show-and-tell session of the weekly luncheon I have with some friends, I decided that I’d make a combination Magic 8 Ball / Cylon Detector, the idea being that one could reasonably ask the Magic 8 Ball if one were a Cylon — I mean..why not? — which would be a lot easier than what Baltar was trying to construct, and wouldn’t require blood samples or anything. You could just ask yourself, in the privacy of your own home or a public restroom, and then choose whether or not you wanted to share your result.
So, I hooked it up to an accelerometer that detects the normative shaking motion one inflicts on the Magic 8 Ball..the evil rabbit then divines the response.
Anyway, it definitely works.
The Ersatz Cylon Detector is meant for entertainment purposes only. It does not purport to factually report whether or not individuals are Cylons, except for Don Milvio. (He’s definitely a weird hybrid Franco-Italian Cylon thing.) The results are for home amusement and cannot be used for discovery or detection of actual Cylons, their friends or family. The results cannot be used for legal purposes, nor as a sanction for physical violence. The Ersatz Cylon Detector and its results are not endorsed by the producers of Battlestar Galactica, The SciFi Channel, or its affiliates and their station managers.
Arduino Code
#include <Wire.h>
#include <math.h>
// http://wiring.org.co/reference/libraries/Wire/index.html
// On the Arduino board, Analog In 4 is SDA, Analog In 5 is SCL
// These correspond to pin 27 (PC4/ADC4/SDA) and pin 28 (PC5/ADC5/SCL) on the Atmega8
// The Wire class handles the TWI transactions, abstracting the nitty–gritty to make
// prototyping easy.
// This sketch has two TWI devices connected to it — a LIS3LV02DQ tri–axis accelerometer
// and the MAX6953 5x7 matrix LED driver. The MAX6953 is at address 0x50, and the LIS3LV02DQ is
// at address 0x1D.
char mAnswer_1[19] = {‘S’,‘i’,‘g’,‘n’,‘s’,‘ ‘,‘p’,‘o’,‘i’,‘n’,‘t’,‘ ‘,‘t’,‘o’,‘ ‘,‘y’,‘e’,‘s’,0x00};
char mAnswer_2[4] = {‘Y’,‘e’,‘s’,0x00};
char mAnswer_3[12] = {‘M’,‘o’,‘s’,‘t’,‘ ‘,‘l’,‘i’,‘k’,‘e’,‘l’,‘y’,0x00};
char mAnswer_4[16] = {‘W’,‘i’,‘t’,‘h’,‘o’,‘u’,‘t’,‘ ‘,‘a’,‘ ‘,‘d’,‘o’,‘u’,‘b’,‘t’,0x00};
char mAnswer_5{16] = {‘Y’,‘e’,‘s’,‘,’,‘ ‘,‘d’,‘e’,‘f’,‘i’,‘n’,‘i’,‘t’,‘e’,‘l’,‘y’,0x00};
char mAnswer_6[17] = {‘A’,‘s’,‘ ‘,‘I’,‘ ‘,‘s’,‘e’,‘e’,‘ ‘,‘i’,‘t’,‘,’,‘ ‘,‘y’,‘e’,‘s’,0x00};
char mAnswer_7[19] = {‘Y’,‘o’,‘u’,‘ ‘,‘m’,‘a’,‘y’,‘ ‘,‘r’,‘e’,‘l’,‘y’,‘ ‘,‘o’,‘n’,‘ ‘,‘i’,‘t’,0x00};
char mAnswer_8[13] = {‘O’,‘u’,‘t’,‘l’,‘o’,‘o’,‘k’,‘ ‘,‘g’,‘o’,‘o’,‘d’,0x00};
char mAnswer_9[14] = {‘I’,‘t’,‘ ‘,‘i’,‘s’,‘ ‘,‘c’,‘e’,‘r’,‘t’,‘a’,‘i’,‘n’,0x00};
char mAnswer_10[19] = {‘I’,‘t’,‘ ‘,‘i’,‘s’,‘ ‘,‘d’,‘e’,‘c’,‘i’,‘d’,‘e’,‘d’,‘l’,‘y’,‘ ‘,‘s’,‘o’,0x00};
char mAnswer_11[22] = {‘R’,‘e’,‘p’,‘l’,‘y’,‘ ‘,‘h’,‘a’,‘z’,‘y’,‘,’,‘ ‘,‘t’,‘r’,‘y’,‘ ‘,‘a’,‘g’,‘a’,‘i’,‘n’,0x00};
char mAnswer_12[24] = {‘B’,‘e’,‘t’,‘t’,‘e’,‘r’,‘ ‘,‘n’,‘o’,‘t’,‘ ‘,‘t’,‘e’,‘l’,‘l’,‘ ‘,‘y’,‘o’,‘u’,‘ ‘,‘n’,‘o’,‘w’,0x00};
char mAnswer_13[16] = {‘A’,‘s’,‘k’,‘ ‘,‘a’,‘g’,‘a’,‘i’,‘n’,‘ ‘,‘l’,‘a’,‘t’,‘e’,‘r’,0x00};
char mAnswer_14[26] = {‘C’,‘o’,‘n’,‘c’,‘e’,‘n’,‘t’,‘r’,‘a’,‘t’,‘e’,‘ ‘,‘a’,‘n’,‘d’,‘ ‘,‘a’,‘s’,‘k’,‘ ‘,‘a’,‘g’,‘a’,‘i’,‘n’,0x00};
char mAnswer_15[19] = {‘C’,‘a’,‘n’,‘n’,‘o’,‘t’,‘ ‘,‘p’,‘r’,‘e’,‘d’,‘i’,‘c’,‘t’,‘ ‘,‘n’,‘o’,‘w’,0x00};
char mAnswer_16[18] = {‘M’,‘y’,‘ ‘,‘s’,‘o’,‘u’,‘r’,‘c’,‘e’,‘s’,‘ ‘,‘s’,‘a’,‘y’,‘ ‘,‘n’,‘o’,0x00};
char mAnswer_17[14] = {‘V’,‘e’,‘r’,‘y’,‘ ‘,‘d’,‘o’,‘u’,‘b’,‘t’,‘f’,‘u’,‘l’,0x00};
char mAnswer_18[20] = {‘O’,‘u’,‘t’,‘l’,‘o’,‘o’,‘k’,‘ ‘,‘n’,‘o’,‘t’,‘ ‘,‘s’,‘o’,‘ ‘,‘g’,‘o’,‘o’,‘d’,0x00};
char mAnswer_19[18] = {‘D’,‘o’,‘n’,‘‘‘,‘t’,‘ ‘,‘c’,‘o’,‘u’,‘n’,‘t’,‘ ‘,‘o’,‘n’,‘ ‘,‘i’,‘t’,0x00};
void setup()
{
Serial.begin(9600);
CLKPR = (1<<CLKPCE);
CLKPR = 0;
// initialize the LIS3LV02DQ
Wire.begin(); // join i2c bus (address optional for master)
Wire.beginTransmission(0x1D);
Wire.send(0x20); // CTRL_REG1 (20h)
Wire.send(0x87); // Device on, 40hz, normal mode, all axis‘s enabled
Wire.endTransmission();
// initialize the MAX6953
Wire.beginTransmission(0x50);
Wire.send(0x07); // Display Test
Wire.send(0x00); // Normal Operation
Wire.endTransmission();
Wire.beginTransmission(0x50);
Wire.send(0x01); // Intensity16
Wire.send(0x0F); // Full
Wire.endTransmission();
Wire.beginTransmission(0x50);
Wire.send(0x04); // configuration register
Wire.send(0x01); // disable shutdown mode
Wire.endTransmission();
initializeSpecialCharacters();
}
void loop() {
int z_val, x_val, y_val;
int sum_sq, sum_sq_2, diff, mShake, message;
int max_accel;
byte i;
message = 0;
setCharacter(0x00);
delay(random(500,1000));
setCharacter(0x01);
delay(random(500,1500));
x_val = getX();
y_val = getY();
z_val = getZ();
sum_sq = sqrt(pow(x_val, 2) + pow(y_val, 2) + pow(z_val, 2));
delay(100);
x_val = getX();
y_val = getY();
z_val = getZ();
mShake = 0;
sum_sq_2 = sqrt(pow(x_val, 2) + pow(y_val, 2) + pow(z_val, 2));
diff = abs(sum_sq–sum_sq_2);
if(diff > 300) { mShake = 1; }
if(diff > 1000) { mShake = 2; }
if(diff > 1200) { mShake = 3; }
//Serial.print(diff); Serial.print(" "); Serial.print(max_accel); Serial.print(" "); Serial.println(mShake);
if(diff > max_accel) max_accel = diff;
//delay(500);
if(mShake > 0) {
message = random(0,18);
for(int i=0; i<3; i++) {
setCharacter(‘*’); delay(500); setCharacter(‘ ‘); delay(500);
}
} else {
message = –1;
}
switch(message) {
case 0:
i = 0;
while(mAnswer_1[i] != 0x00) {
setCharacter(mAnswer_1[i]); delay(800);
i++;
}
break;
case 1:
i = 0;
while(mAnswer_2[i] != 0x00) {
setCharacter(mAnswer_2[i]); delay(800);
i++;
}
case 2:
i = 0;
while(mAnswer_3[i] != 0x00) {
setCharacter(mAnswer_3[i]); delay(800);
i++;
}
break;
case 3:
i = 0;
while(mAnswer_4[i] != 0x00) {
setCharacter(mAnswer_4[i]); delay(800);
i++;
}
break;
case 4:
i = 0;
while(mAnswer_5[i] != 0x00) {
setCharacter(mAnswer_5[i]); delay(800);
i++;
}
break;
case 5:
i = 0;
while(mAnswer_5[i] != 0x00) {
setCharacter(mAnswer_5[i]); delay(800);
i++;
}
break;
case 6:
i = 0;
while(mAnswer_6[i] != 0x00) {
setCharacter(mAnswer_6[i]); delay(800);
i++;
}
break;
case 7:
i = 0;
while(mAnswer_7[i] != 0x00) {
setCharacter(mAnswer_7[i]); delay(800);
i++;
}
break;
case 8:
i = 0;
while(mAnswer_8[i] != 0x00) {
setCharacter(mAnswer_8[i]); delay(800);
i++;
}
break;
case 9:
i = 0;
while(mAnswer_9[i] != 0x00) {
setCharacter(mAnswer_9[i]); delay(800);
i++;
}
break;
case 10:
i = 0;
while(mAnswer_10[i] != 0x00) {
setCharacter(mAnswer_10[i]); delay(800);
i++;
}
break;
case 11:
i = 0;
while(mAnswer_11[i] != 0x00) {
setCharacter(mAnswer_11[i]); delay(800);
i++;
}
break;
case 12:
i = 0;
while(mAnswer_12[i] != 0x00) {
setCharacter(mAnswer_12[i]); delay(800);
i++;
}
break;
case 13:
i = 0;
while(mAnswer_13[i] != 0x00) {
setCharacter(mAnswer_13[i]); delay(800);
i++;
}
break;
case 14:
i = 0;
while(mAnswer_14[i] != 0x00) {
setCharacter(mAnswer_14[i]); delay(800);
i++;
}
break;
case 15:
i = 0;
while(mAnswer_15[i] != 0x00) {
setCharacter(mAnswer_15[i]); delay(800);
i++;
}
break;
case 16:
i = 0;
while(mAnswer_16[i] != 0x00) {
setCharacter(mAnswer_16[i]); delay(800);
i++;
}
break;
case 17
i = 0;
while(mAnswer_17[i] != 0x00) {
setCharacter(mAnswer_17[i]); delay(800);
i++;
}
break;
case 18:
i = 0;
while(mAnswer_18[i] != 0x00) {
setCharacter(mAnswer_18[i]); delay(800);
i++;
}
break;
case 19:
i = 0;
while(mAnswer_19[i] != 0x00) {
setCharacter(mAnswer_19[i]); delay(800);
i++;
}
break;
default:
break;
}
message = 0;
}
void flickerOutIntensity()
{
for(int i=16; i>=0; i––) {
Wire.beginTransmission(0x50);
Wire.send(0x01); // Intensity16
Wire.send(i);
Wire.endTransmission();
delay(random(400));
if(i % 4 == 0) {
Wire.beginTransmission(0x50);
Wire.send(0x01); // Intensity16
Wire.send(0x02);
Wire.endTransmission();
delay(random(500));
}
}
Wire.beginTransmission(0x50);
Wire.send(0x01); // Intensity16
Wire.send(0x0f); // Full
Wire.endTransmission();
}
// create two custom characters that look like an evil cylon detecting magic 8 ball rabbit
// this writes the two characters by writing first to register 0x05 the value 0x80, which is
// the address of the first 7 bits of he first user–created font character. Each character
// has 5 rows of 7 bits, you write to each row in sequence. The MAX6953 will autoincrement
// the address written during the I2C/TWI transaction, so each of these Wire.send instructions
// is writing to the next row.
void initializeSpecialCharacters
{
Wire.beginTransmission(0x50);
Wire.send(0x05);
Wire.send(0x80);
// character 0x00
Wire.send(0x7f);
Wire.send(0x14);
Wire.send(0x44);
Wire.send(0x14);
Wire.send(0x7f);
// character 0x01
Wire.send(0x7f);
Wire.send(0x04);
Wire.send(0x44);
Wire.send(0x04);
Wire.send(0x7f);
Wire.endTransmission();
}
void setCharacter(char c)
{
// if(c >= 0x20 && c <= 0x7F) {
Wire.beginTransmission(0x50);
Wire.send(0x20); // Digit 0 Plane 0
Wire.send(c); // N
Wire.endTransmission();
// }
}
int getX()
{
byte x_val_l, x_val_h;
int x_val, y_val;
//Serial.println("hello?");
//byte in_byte;
// transmit to device with address 0x1D
// according to the LIS3L* datasheet, the i2c address of is fixed
// at the factory at 0011101b (0x1D)
Wire.beginTransmission(0x1D);
// send the sub address for the register we want to read
// this is for the OUTZ_H register
// n.b. supposedly masking the register address with 0x80,
// you can do multiple reads, with the register address auto–incremented
Wire.send(0x28);
// stop transmitting
Wire.endTransmission();
// Now do a transfer reading one byte from the LIS3L*
// This data will be the contents of register 0x28
Wire.requestFrom(0x1D, 1);
while(Wire.available())
{
x_val_l = Wire.receive();
}
Wire.beginTransmission(0x1D); Wire.send(0x29); Wire.endTransmission();
Wire.requestFrom(0x1D, 1);
while(Wire.available())
{
x_val_h = Wire.receive();
}
x_val = x_val_h;
x_val <<= 8;
x_val += x_val_l;
return x_val;
}
int getY()
{
byte y_val_l, y_val_h;
int y_val;
// Y Axis
Wire.beginTransmission(0x1D); Wire.send(0x2A); Wire.endTransmission();
Wire.requestFrom(0x1D, 1);
while(Wire.available())
{
y_val_l = Wire.receive();
}
Wire.beginTransmission(0x1D); Wire.send(0x2B); Wire.endTransmission();
Wire.requestFrom(0x1D, 1);
while(Wire.available())
{
y_val_h = Wire.receive();
}
y_val = y_val_h;
y_val <<= 8;
y_val += y_val_l;
return y_val;
}
int getZ()
{
byte z_val_l, z_val_h;
int z_val;
// Z Axis
Wire.beginTransmission(0x1D); Wire.send(0x2C); Wire.endTransmission();
Wire.requestFrom(0x1D, 1);
while(Wire.available())
{
z_val_l = Wire.receive();
}
Wire.beginTransmission(0x1D); Wire.send(0x2D); Wire.endTransmission();
Wire.requestFrom(0x1D, 1);
while(Wire.available())
{
z_val_h = Wire.receive();
}
z_val = z_val_h;
z_val <<= 8;
z_val += z_val_l;
return z_val;
}
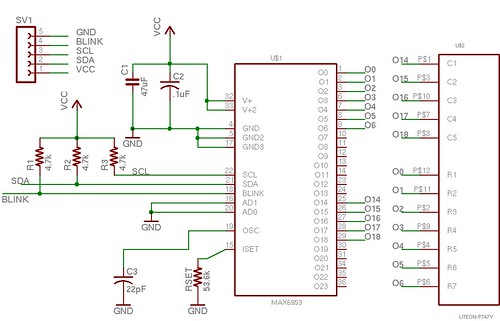
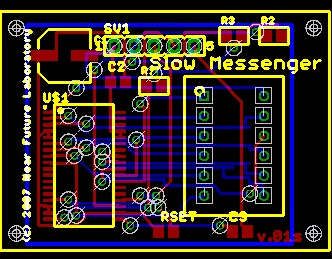
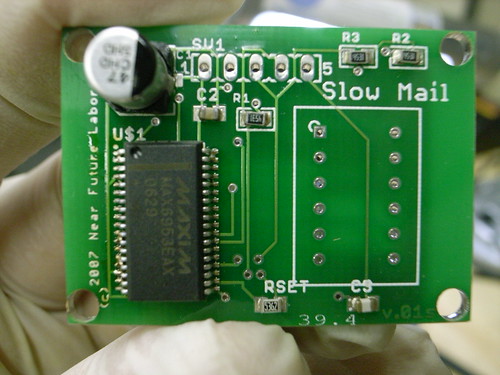
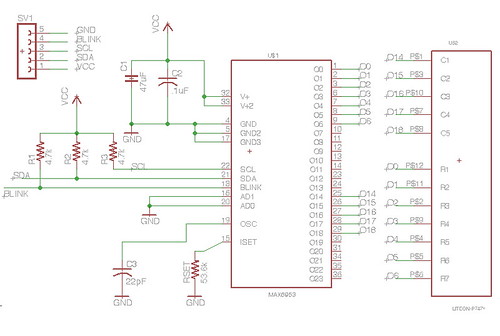
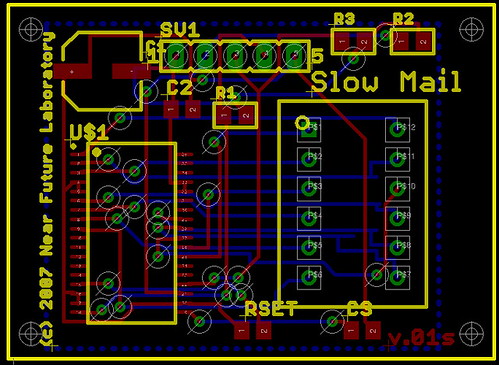
Update — here are a schematic and a board layout for the little board in the picture that contains the MAX6953 and the Matrix LED. I used my own breakout board like this, rather than run a whole bunch of wires from the 6953 to the Matrix LED.

This work is licensed under a Creative Commons Attribution-ShareAlike 3.0 License.
Technorati Tags: Arduino, Cylon Detector
hi, nice work.
I saw you did schematics in Eagle, did you track down a .lbr file for the MAX6953? I’m using the MAX6952, but would greatly appreciate a library file for the I2C version if it is no bother?
Sure, I’ll email it to you.
thanks Julian
Hi,
I’m an electronics teacher and would like to make a PCB in Eagle with the MAX6952. Is it possible to mail me that library too, please? Thanks.
I’ve added a link to the library file in the post; feel free to download it.
Hi-
Thanks for the blog- it has been very helpful. I am working on a project for an education project using a max6953 to power 2 5×7 led matrix. I copied the first parts of your code to test my connections and had no response from the led. I’ve double checked all my wiring, and I am fairly certain it is correct. Does your code work to power 2 led’s? Any thoughts on other things to check?
Should work, but there are often little simple things that can get in the way. Me, personally? I put a logic analyzer or scope on the thing to see what’s going on before I guess too much. Especially now that you can get an excellent logic analyzer for $200 or less, it’s well worth the investment because you’ll have it and save time and save yourself from frustration. Here’s a review of the Logicport (http://www.nearfuturelaboratory.com/2008/06/21/logicport-overview/) and the Salee Logic (http://www.nearfuturelaboratory.com/2008/10/24/a-new-logic-analyzer-and-an-i2c-compass/). Otherwise, double-check your connections, make sure the data and address lines (SDL and SDA) from the Arduino are going to the correct pins on the MAX6953 and that the address setting pins on the MAX6953 are appropriately configured for the address you are using to point to it — 0x50. Are both chips getting power? Is there a short between the supply and ground? Double check the wiring to the Matrix LEDs. There are lots of wires there, definitely. Plenty of opportunities to mis-wire something..plenty. I’ve put a diagram of my PCB board and schematic in an update to the post, which might help.
The code itself just communicates with the MAX6953 and issues commands to it. You’ll want to familiarize yourself with the specification sheet of that device to look into how to get it to control the second 5×7 LED matrix, which it certainly will do. (I think it will control up to 4, which just requires connecting them properly — lots of wires, etc.)
The link to your Eagle Library seems to be broken. Could you either fix that or email me the library please?
Thanks for this write up. Very good
I’m sorry — it seems to be gone forever, unfortunately. It shouldn’t be too difficult to create a library for the MAX6953. It’s a fairly straightforward part.